


The production process of hand tools and wood cutting planers
The cutting planer is composed of three parts: a planer blade, a planer wedge and a planer. It is an indispensable hand tool for the wood craftsman when splicing wooden boards. So, how to make a self-made cutting planer that does not cost money but also has a compelling standard? In fact, the production is very simple. The following carpenter circle will share a tutorial diagram of the cutting planer for the circle friends.

Main material:
Wooden planks, planing iron (old woodworking chisels), woodworking chisels, hand drills, woodworking saws, Tootock hand planes, Tootock squares, wire gauges, woodworking setbacks, etc.
Production steps:
Today I am sharing a tutorial on how to make a cutting planer. The cutting planer is made by first using old wood chisels as planing iron, then the planing iron angle design and planing groove production, as well as the planing backing board production and design, and finally the trial planing process. When it is made, the precision requirements are relatively high. Next, let's take a look at the specific production steps.
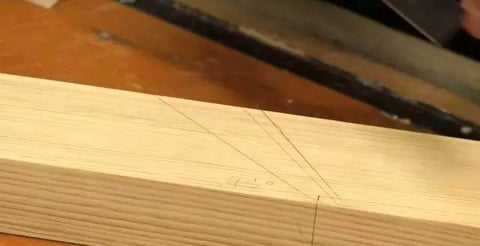
Step 1: Planing body design
The first step is to make a good planer body, the planer body specification is 25*7*3cm, and use a square to draw a 45 degree planing iron line at 15cm of the planing body, which is used to install the planing iron position, and then the planing iron ( 13mm old flat chisel) leaning on the 45 degree planing iron line to draw the position of the planing iron. Then, put a triangular plank with an angle of 13 degrees (as shown in the figure, used to make planing wedge), close to the planing iron wire, and draw the position map of the planing wedge. Finally, use a wire gauge to measure the width of the planed iron, and mark the planer notch.


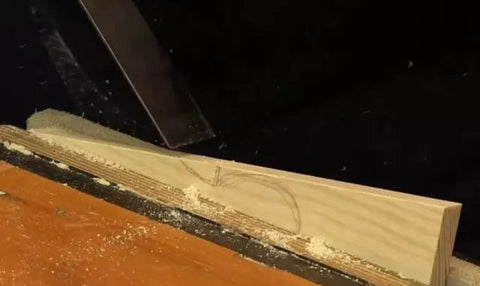
Step 2: dig out the planing groove
Use a hand saw to cut the position of the planing groove according to the line. The depth of the sawing is the width of the planing iron (13mm) drawn with the wire gauge during the design. Then use a woodworking chisel to cut the planing groove from the inside to the outside. Be careful not to use too much force to avoid accidentally hurting the planing groove. After both sides are chiseled, trim the bottom of the planing groove. Dig out the planer, and finally use a carpenter's chisel to smooth the walls and bottom of the planer.


Step 3: Planing wedge production
The planing wedge plays a role of fixing the planing iron. First, insert the planing iron (old wood chisel) and the planing wedge (triangular plank) into the planer slot, and then use a pencil to draw the planing wedge according to your preference, and then use it according to the design. The carpenter chiseled out the shape. However, the back of the planing wedge must be designed into a bayonet shape so that it can be hit by a hammer when the planer is retracted.


Then make an arc-shaped opening in the head of the wedge so that the shavings will come out along the arc-shaped opening. Then use carpentry to frustrate the shape of the wedge, and then polish it with sandpaper. Also note that the angle of the wedge should not be too large, otherwise the wedge will not be smashed tightly and it will be easy to retreat. Generally, the angle of the wedge is 10-13 degrees. Also, the material doesn’t need to be too hard, but it can’t be too soft.


Step 4: Make planing backing
There are generally two methods for the design of planing backing. One is to add a plank directly on the side of the planing body, and the other is to install wooden strips on the planing surface as a backing. Today’s diy tutorial is to install wood strips on the planing surface as a planing backing board (as shown in the picture). First, make a wooden strip the same size as the planing surface. Then fix the two ends of the wooden strip with wood screws. The screw mouth can be designed as a movable elongated mouth, so that you can move the planing board according to your needs, so as to adjust the specifications of the planer in a disguised form.


Step 5: Shaping
Generally, hardwoods that are dry and wear-resistant and not easily deformed should be used for the planer. After the backing board is made, use a pencil to draw the shape of the plane you like on the plane. Generally, it is required that the tail and the head feel comfortable. After drawing the shape of the planing body, then use a wood chisel to chisel out the prototype of the planing body, and finally use woodworking frustration and sandpaper to polish.


Step 6: Finished!
When using the cutting planer to plan the wood, it is necessary to follow the wood grain for smooth planing, so that it is easy to make the planing surface smooth and it is more labor-saving. When pushing the planer, hold the planer's tail with your right hand, hold the planer head firmly with your left hand, and press the planer against the plank, and push your hands parallel to the left, evenly, in one go. But after you push the planing, a long, uniform thickness of shavings will be spit out from the planing opening.


Sample Block Quote
Praesent vestibulum congue tellus at fringilla. Curabitur vitae semper sem, eu convallis est. Cras felis nunc commodo loremous convallis vitae interdum non nisl. Maecenas ac est sit amet augue pharetra convallis nec danos.
Sample Paragraph Text
Praesent vestibulum congue tellus at fringilla. Curabitur vitae semper sem, eu convallis est. Cras felis nunc commodo eu convallis vitae interdum non nisl. Maecenas ac est sit amet augue pharetra convallis nec danos dui.
Cras suscipit quam et turpis eleifend vitae malesuada magna congue. Damus id ullamcorper neque. Sed vitae mi a mi pretium aliquet ac sed elitos. Pellentesque nulla eros accumsan quis justo at tincidunt lobortis denimes loremous. Suspendisse vestibulum lectus in lectus volutpat, ut dapibus purus pulvinar. Vestibulum sit amet auctor ipsum.


